Bathroom Tub Glass Door
Dan has been a homeowner for some 40 years and has nearly always done his own repair and improvement tasks. He is a licensed electrician.
Installing a bathtub shower door is a simple task and well within the ability of most homeowners. A new shower door can benefit a bathroom enormously by providing a more attractive bathtub area and keeping shower spray out of the rest of the bathroom. Consider installing your own bathtub shower door and say goodbye to obnoxious billowing shower curtains forever - it just isn't that hard to do.
A wide variety of bathtub shower doors are available, but this article is aimed at a tub door intended to fit between walls on each end of the tub. Freestanding glass doors and partitions are also available but require different installation techniques.
Even without considering other types of bathtub shower doors, there is still a huge array of possibilities, from clear glass doors to frosted doors to patterned doors. Pick one within your budget and that will fit across the tub - a little extra length here is fine as it will be cut off in the installation.
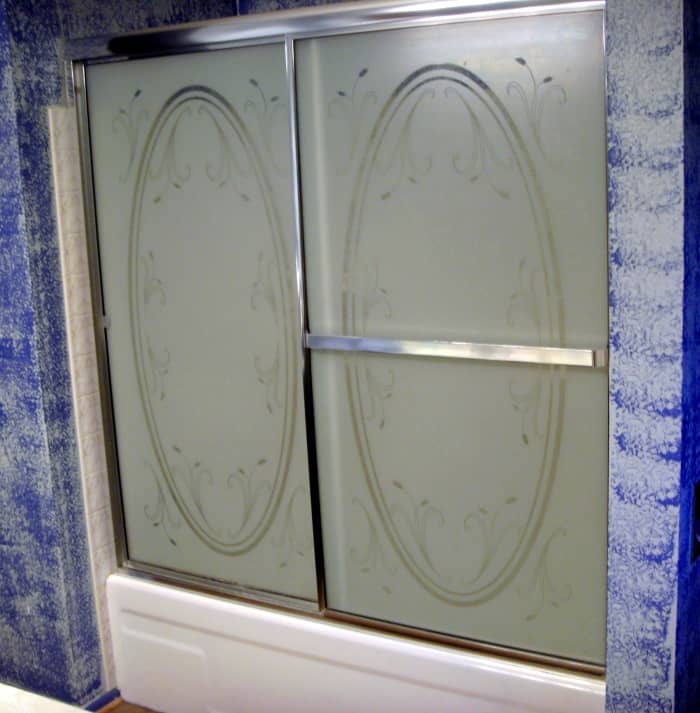
Forsted Bathtub Shower Door
Dan Harmon
Tools You'll Need
- Drill. While a cordless drill is nice, it is unnecessary - any power drill will work.
- ¼" Drill bit. The appropriate drill bit must be used - ceramic tile will require a different bit than sheetrock or wood.
- Measuring tape.
- Screwdriver. Most likely a phillips tip screwdriver will be needed, but it might be a flat tip. Check the screws that came with the bathtub shower door.
- masking tape. Common ¾" masking will do fine.
- Hacksaw. The top and bottom tracks will most likely need to cut to length, so a saw suitable for cutting metal is needed
- File.
- Miter box. Cuts must be made square; a miter box that the saw will fit in is the best answer here.
- Level. A two-foot to four-foot level is recommended, but a small torpedo level will work if used carefully.
Most of these tools, except possibly the specialty drill bit for ceramic tile, should be in your own homeowner's tool kit. If not, they will have to be purchased - use the opportunity to start your own homeowner's tool set.
Supplies needed
- Silicon bathtub caulk. One of the larger tubes not requiring a caulking gun should be sufficient
- Plastic anchors, with screws. These are probably supplied with the bathtub shower door, but if not will have to be supplied by the homeowner - #8 screws, 1½" long, with the appropriate plastic anchors are recommended.
- Simple cleaning supplies. The area of the bathtub where the door frame will sit needs to well cleaned.
Bathtub Shower Door installation
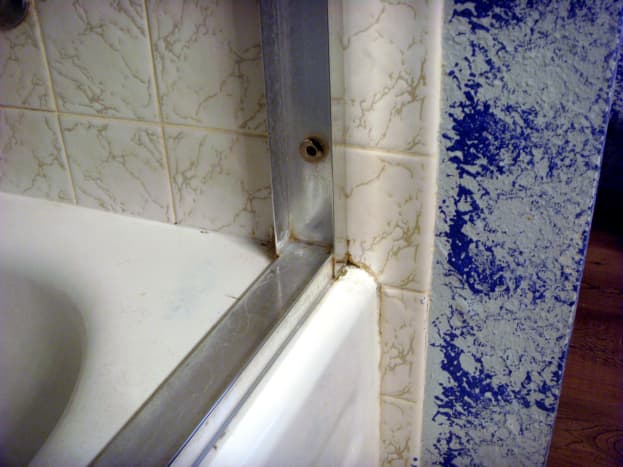


Side piece fits over bottom track
Install the Bathtub Shower Door
Begin installation with a thorough cleaning of the tub and wall areas where the track will go. Soap and water are fine, with perhaps a final wipe down with alcohol. Let dry completely before proceeding.
- Measure the distance between walls at the bathtub level. Check the same distance at approximately where the top track will go; if the two measurements are not within about ¼" of each other the walls will have to be fixed so that that they are parallel with each other. It is a good idea to also check the "level" of the wall with the level - both walls need to be vertical.
- Deduct 1/8" from the distance measured at the tub level - the outside track sections will fit over the bottom track and need clearance at both ends. Lay the bottom track on the tub and verify that the side pieces will slide over them. If not, additional track will need to cut off.
- With the track on the tub, mark the inside edge with a strip of masking tape. The track sits on the tub with the higher edge to the outside; this is to prevent water from running down the doors and ending up outside the tub area. Remove the track and apply a bead of caulking down the bottom of the track, at the outside edge. This will again prevent water from seeping under the track and ending up outside the tub. No caulk is used on the inside edge of the track so that water that does manage to get under the track will drain into the tub.
- Replace the track onto the tub, using the applied masking tape as a guide for correct alignment.
- Set one of the side pieces into place over the bottom track and level it with the level. Mark the location of the screw holes on the wall behind the track. Repeat for the other side. Note in the photo to the right that the side piece is installed over tile and that the tile does not reach the top of the side piece. In this case, the tile is high enough to still give adequate support to the new door, but if the tile only comes up a foot or two other arrangements will have to be made to support the side pieces. As they are the entire support for the door it is imperative that they themselves be adequately supported.
- Carefully drill a ¼" hole into the wall. Do not try to drill ceramic tile with a normal drill bit - it will only chip the tile without drilling it. If tile covers the wall behind the side pieces a special glass and ceramic drill bit must be used. Insert the plastic anchors into the ¼" holes
- Again apply caulking to the outside edge of the side piece where it contacts the wall and carefully fit the side piece into the bottom track and against the wall. Rubber bumpers, supplied with the door, are now fitted over the screw and the screw is used to fasten the side pieces to the wall. Do not over-tighten the screws; some side tracks are not intended to fit tight to the wall at the location of the screw. Excess caulking can be wiped with a damp fingertip to provide a neat-looking bead of caulk. Repeat for the other side and clean up the caulking on the bottom track now that it is held securely in place.
- Measure the length necessary for the top track and again deduct 1/8" from that measurement. Fit the top track into place over the top of the side pieces.
- Assemble the doors with handles and roller assemblies as necessary. Fit the outside door into place by tilting the bottom edge into the tub area and placing the roller onto the outside track. Repeat for the inner door. Some bathtub doors have a door guide that fits onto the bottom track; attach as necessary.
- Apply caulking to the joints where the side pieces meet the bottom track.
Congratulations: you have finished another home improvement project! Clean up any mess, empty boxes and your tools - you're ready to move on to the next project. Perhaps a new shower head to save energy and water - whatever it might be you can proceed with the secure knowledge that you really can do your own home improvement projects.
DIY Bathtub Shower Door Install
This article is accurate and true to the best of the author's knowledge. Content is for informational or entertainment purposes only and does not substitute for personal counsel or professional advice in business, financial, legal, or technical matters.
© 2010 Dan Harmon
Dan Harmon (author) from Boise, Idaho on February 21, 2013:
Vinayak1000, that's exactly why I do all my own repair and improvement work. In all my years I've had workers in only to work on air conditioning systems and to pull a well pump. In both cases I simply don't have the tools and equipment for the job, and I'm not going to spend hundreds of dollars for tools I'll never use again.
Little jobs like this shower door, I'll buy a few cheap tools - it's still cheaper than hiring someone - and hope they will be useful in the future. The ceramic drill bit, for instance, I've used several times.
vinayak1000 from Minneapolis on February 20, 2013:
This saved me quite a bit of time and money. Often times, when we get others to do it for us we end up supervising in what can sometimes become a poorly done job.
Read More From Dengarden
Voted up and useful!
Dan Harmon (author) from Boise, Idaho on May 08, 2012:
I'm not quite picturing what you are saying here. Is the tub edge rounded, convex up maybe with both edges lower than the center? This should still allow the bottom track to set flat, though it would have a tendency to roll one way or the other (in towards the tub our outward). If this is the case, you might be able to install just as normal, and then fill the small gap between the sides of the bottom track and the tub with silicone caulk.
The bottom track doesn't carry any weight, anyway - the door is supported by the top track which is in turn supported by the sides. Yes, the sides should sit firmly on the bottom track, but the weight isn't so great that the screws holding the sides in place won't carry the entire weight of the doors.
If the curve is up towards the front of the tub and down towards the back, it is probably not going to work. If the curvature is very small you just MIGHT be able to bend the bottom track to fit the tub, hang the doors high enough to fit properly at the ends and still be in the track in the center. There isn't typically much play here, though, and I would have doubts that it would work.
Ben on May 08, 2012:
Hi Wilderness,
The edge of my tub is curved so i have a question about the bottom track. At the ends towards each wall there is about 4-5 inches of flat surface while the mid section of the tub edge has a curve to it which won't allow the bottom track to sit flat. any suggestions on what I can do?
Thanks
Dan Harmon (author) from Boise, Idaho on September 09, 2011:
Thank you for the compliment - I do try to give detailed instructions for the person that has not done the work before.
I'm glad you found the hub useful, and thanks for the comment.
Crissy on September 08, 2011:
Great instructions for 1st timer. Better instructions than the others out there. Very detailed and I liked knowing why I needed to bead the silicone on the track the way you instructed.
Dan Harmon (author) from Boise, Idaho on August 19, 2011:
If it is a very slight amount the doors will still work fine - the edges where the doors meet the wall are typically around 2" wide. As long as the doors will fit completely into the sides they will be fine.
If the tub and/or walls are out of square more than that the walls or tub must be leveled to use sliding doors. This will mean rebuilding the walls or leveling the tub, but it would be very unusual to find a tub that is so far out of level that the doors would not work.
This could be checked by using a large square and a five foot long straight board - set the square on the tub and extend it up with the board. If the board contacts the wall (say at the tub level) but is more than about 1" from the wall at 5' above the tub work will have to be done to either the tub or the wall.
ithadug on August 12, 2011:
What if the tub is slightly off-level?
Dan Harmon (author) from Boise, Idaho on July 27, 2010:
I'm sure you will do just fine with your project. Just take it slow and make sure you understand each step before proceeding.
Kay Creates from Ohio on July 27, 2010:
Great information.My husband will be tackling this job soon so I've saved this for him.
Dan Harmon (author) from Boise, Idaho on July 27, 2010:
I'm glad you found the article useful; it really is an easy task that anyone can do.
susanlang on July 27, 2010:
I like this...my next door will be done using your method. Rated up!
Source: https://dengarden.com/remodeling/How-to-Install-a-Bathtub-Shower-Door


No comments:
Post a Comment